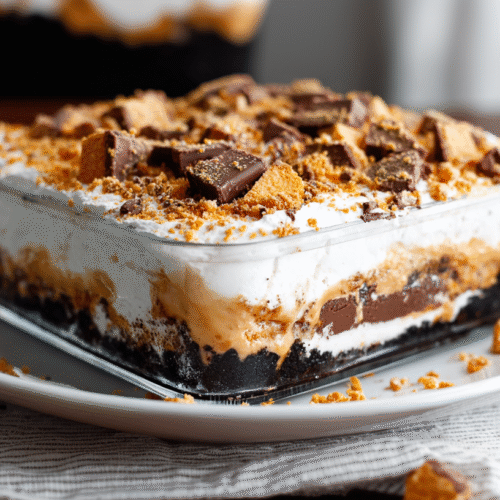
There are desserts that you make once and instantly know they’ll be a permanent part of your recipe box. For me, Creamy Butterfinger Lush Dessert is one of those irresistible creations. It’s a no-bake wonder, combining layers of Oreo cookie crust, fluffy peanut butter cream cheese, chocolate pudding, and whipped topping—all crowned with crunchy Butterfinger candy pieces.
This dessert isn’t just a treat; it’s a showstopper for family gatherings, summer cookouts, or even a cozy night when you crave something sweet and indulgent. It’s creamy, crunchy, and rich, with that perfect balance of peanut butter and chocolate that always makes people go back for seconds.
Today, I’m walking you through how to make this crowd-pleasing layered dessert step by step. I’ll also share tips, variations, storage advice, and why this recipe deserves a spot on your dessert table.
Why You’ll Love This Butterfinger Lush Dessert
-
No-bake recipe – No oven required, perfect for summer or quick prep.
-
Layers of flavor – Oreo crust, creamy peanut butter, silky pudding, and crunchy Butterfinger topping.
-
Crowd favorite – Loved by kids and adults alike.
-
Easy to make ahead – Tastes even better after chilling.
-
Versatile – Switch up candy bars or pudding flavors for fun variations.
Ingredients You’ll Need
Here’s everything required for this lush dessert:
For the Crust
-
30 Oreo cookies (with filling)
-
½ cup (113 g) unsalted butter, melted
-
12 mini Butterfinger bars, chopped (reserve ¼ cup for topping)
For the Layers
-
8 oz cream cheese, softened
-
½ cup (129 g) creamy peanut butter
-
1 cup (125 g) confectioners’ sugar
-
3 cups (180 g) whipped topping, divided
-
1 box (5.1 oz) instant chocolate pudding mix
-
2 cups (490 g) cold whole milk
Step-by-Step Instructions
Step 1: Prepare the Crust
-
Place Oreo cookies in a food processor and pulse until fine crumbs form.
-
Mix in melted butter until combined.
-
Press mixture firmly into the bottom of an ungreased 9-inch square dish.
-
Sprinkle most of the chopped Butterfinger pieces over the crust (save some for topping).
Step 2: Make the Cream Cheese Layer
-
In a large bowl, beat softened cream cheese until smooth.
-
Mix in peanut butter and confectioners’ sugar until blended.
-
Fold in 2 cups of whipped topping until fluffy.
-
Spread evenly over the Butterfinger crust. Refrigerate while making the pudding.
Step 3: Add the Pudding Layer
-
In another bowl, whisk pudding mix with cold milk for 2 minutes.
-
Let sit for 5 minutes until slightly thickened.
-
Spread evenly over the cream cheese layer.
Step 4: Top and Chill
-
Spread the remaining whipped topping over the pudding layer.
-
Sprinkle with reserved Butterfinger pieces.
-
Cover and refrigerate for at least 2 hours (overnight is even better).
Tips for Success
-
Chill longer for best results: The layers set better when chilled overnight.
-
Use full-fat cream cheese: It gives a richer flavor and creamier texture.
-
Don’t skip the filling in Oreos: It helps the crust hold together.
-
Cut with a hot knife: For clean squares, dip your knife in hot water and wipe dry before each slice.
Fun Variations
Want to put a twist on this dessert? Try these variations:
-
Reese’s Lush Dessert – Swap Butterfinger bars for Reese’s Peanut Butter Cups.
-
Nutella Lush – Replace peanut butter in the cream cheese layer with Nutella.
-
Mocha Version – Use mocha or coffee pudding instead of chocolate for a grown-up flavor.
-
Holiday Touch – Add crushed peppermint candies on top for a Christmas version.
-
Pie Version – Make it in a pie dish for a round, pie-like presentation.
Storage and Make-Ahead Tips
-
Fridge: Store covered in the refrigerator for up to 4 days.
-
Freezer: Freeze tightly wrapped for up to 1 month. Thaw in the fridge before serving.
-
Make-ahead: This dessert is best made a day in advance, giving the flavors time to meld.
Perfect for Every Occasion
This dessert is flexible enough to work year-round:
-
Summer cookouts – A chilled, no-bake option that won’t heat up your kitchen.
-
Holiday tables – Decadent enough to stand next to pumpkin and pecan pies.
-
Potlucks & parties – Travels well and is always the first dessert to disappear.
-
Family nights – Easy enough to whip up for a weekend treat.
Frequently Asked Questions
1. Can I use Cool Whip instead of homemade whipped cream?
Yes! This recipe uses whipped topping for convenience, but you can use homemade whipped cream if you prefer.
2. Can I make this in a 9×13 dish?
Absolutely. Just double the recipe, and you’ll have plenty for a bigger crowd.
3. Can I use different pudding flavors?
Yes—vanilla, butterscotch, or even white chocolate pudding all work beautifully.
4. Do Butterfingers stay crunchy?
Yes, the candy stays crunchy even after refrigeration, adding that perfect texture contrast.
Pairing Ideas
If you’re serving this lush dessert at a gathering, here are some fun pairings:
-
With coffee or espresso – The bitterness balances the sweetness.
-
With a light fruit salad – Adds freshness to balance the richness.
-
With a glass of milk – Classic pairing, especially for kids.
Nutritional Estimate (Per Serving – 12 Servings)
-
Calories: ~420
-
Carbohydrates: 38 g
-
Fat: 26 g
-
Protein: 6 g
-
Sugar: 29 g
(These values are estimates and will vary based on brands used.)
External Resources
If you love this recipe, you might also enjoy exploring:
Conclusion
Creamy Butterfinger Lush Dessert is one of those recipes you’ll find yourself making again and again. It’s creamy, crunchy, chocolaty, and oh-so-satisfying. Best of all, it’s no-bake and stress-free—perfect for busy schedules and last-minute gatherings.
Whether you’re bringing it to a potluck, serving it at Thanksgiving, or simply treating your family to something special, this dessert is guaranteed to impress. Just be warned: you might not have leftovers!
Creamy Butterfinger Lush Dessert (Easy No-Bake Recipe)
Ingredients
- For the Crust
- 30 Oreo cookies with filling
- ½ cup 113 g unsalted butter, melted
- 12 mini Butterfinger bars chopped (reserve ¼ cup for topping)
- For the Layers
- 8 oz cream cheese softened
- ½ cup 129 g creamy peanut butter
- 1 cup 125 g confectioners’ sugar
- 3 cups 180 g whipped topping, divided
- 1 box 5.1 oz instant chocolate pudding mix
- 2 cups 490 g cold whole milk
Instructions
- Step 1: Prepare the Crust
- Place Oreo cookies in a food processor and pulse until fine crumbs form.
- Mix in melted butter until combined.
- Press mixture firmly into the bottom of an ungreased 9-inch square dish.
- Sprinkle most of the chopped Butterfinger pieces over the crust (save some for topping).
- Step 2: Make the Cream Cheese Layer
- In a large bowl, beat softened cream cheese until smooth.
- Mix in peanut butter and confectioners’ sugar until blended.
- Fold in 2 cups of whipped topping until fluffy.
- Spread evenly over the Butterfinger crust. Refrigerate while making the pudding.
- Step 3: Add the Pudding Layer
- In another bowl, whisk pudding mix with cold milk for 2 minutes.
- Let sit for 5 minutes until slightly thickened.
- Spread evenly over the cream cheese layer.
- Step 4: Top and Chill
- Spread the remaining whipped topping over the pudding layer.
- Sprinkle with reserved Butterfinger pieces.
- Cover and refrigerate for at least 2 hours (overnight is even better).
- Tips for Success
- Chill longer for best results: The layers set better when chilled overnight.
- Use full-fat cream cheese: It gives a richer flavor and creamier texture.
- Don’t skip the filling in Oreos: It helps the crust hold together.
- Cut with a hot knife: For clean squares, dip your knife in hot water and wipe dry before each slice.
Notes
- Reese’s Lush Dessert – Swap Butterfinger bars for Reese’s Peanut Butter Cups.
- Nutella Lush – Replace peanut butter in the cream cheese layer with Nutella.
- Mocha Version – Use mocha or coffee pudding instead of chocolate for a grown-up flavor.
- Holiday Touch – Add crushed peppermint candies on top for a Christmas version.
- Pie Version – Make it in a pie dish for a round, pie-like presentation.

